


Laying asphalt over concrete is not only possible but can save you thousands of dollars compared to tearing out and replacing your entire driveway. This overlay technique works when your concrete base is stable and properly prepared, delivering a smooth new surface that lasts 15 to 20 years while cutting project costs by 30 to 50 percent.
Understanding Asphalt and Concrete Surfaces
Before starting an overlay project, you need to understand how these two materials interact. The relationship between the base concrete and asphalt overlay determines long-term performance.
What Is Asphalt Overlay?
An asphalt overlay involves applying a new layer of hot mix asphalt directly on top of existing concrete. The overlay typically ranges from one and a half to three inches thick depending on traffic loads. Contractors heat the asphalt to approximately 300 degrees Fahrenheit, allowing it to bond properly and compact into a smooth surface.
How Concrete Stability Impacts Asphalt Installation
The condition of your existing concrete directly affects overlay performance over time. Stable concrete with minimal cracking provides an excellent foundation that prevents asphalt from settling unevenly. Deteriorating concrete with extensive cracks or settlement will transfer these problems directly to the asphalt surface above.
Should You Lay Asphalt Over Existing Concrete?
Deciding whether to overlay or start fresh depends on budget, timeline, and concrete condition. This decision significantly impacts both immediate costs and long-term maintenance requirements.
Advantages of Asphalt Over Concrete
Asphalt overlays cost considerably less than removing concrete and starting from scratch, saving between 30 to 50 percent on project expenses. Installation happens much faster since there’s no demolition or disposal, meaning your driveway is usable again in just a day or two. Asphalt provides a smoother, more flexible surface that absorbs minor ground movements without cracking as readily.
Things to Consider Before You Overlay Asphalt
An asphalt overlay adds height to your existing surface, which may create drainage issues or elevation mismatches with garage floors and sidewalks. The overlay method works best when concrete is relatively level and stable. Climate matters too, as regions with extreme temperature swings may experience different results than moderate weather areas.
Concrete Expansion and Reflective Cracks
Concrete expands and contracts with temperature changes, creating natural joints that can telegraph through the asphalt overlay. These create visible lines or cracks called reflective cracking. While this doesn’t necessarily compromise structural integrity, it affects appearance and may eventually require sealing.
Step-by-Step Guide to Installing Asphalt Over Concrete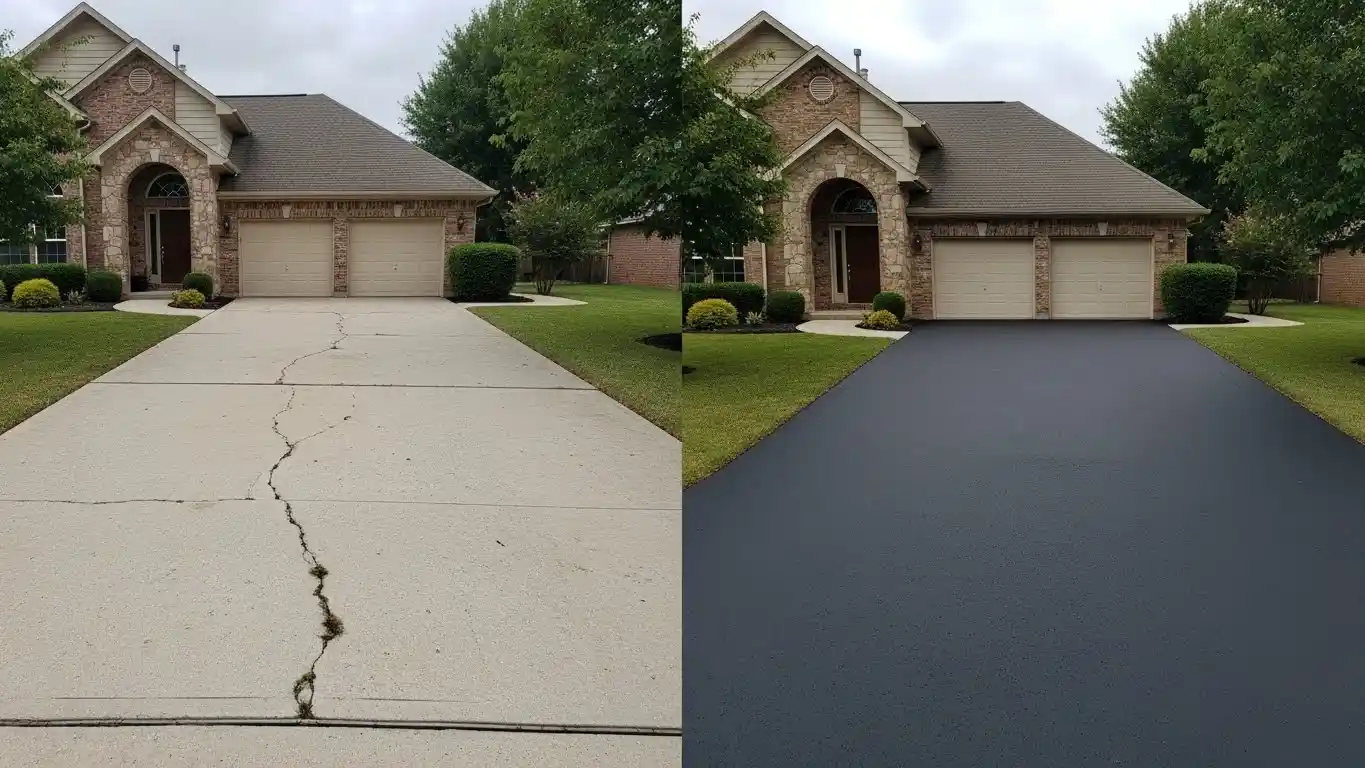
Following proper installation procedures ensures your overlay bonds correctly and performs well for years. Each step builds on the previous one to create a durable surface.
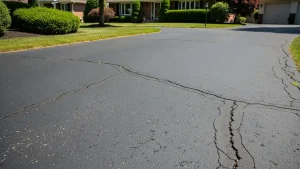
Step 1: Evaluate the Existing Concrete Surface
Walk your entire concrete surface and document all damage including cracks wider than a quarter inch, broken sections, and settlement problems. Use a level to check for significant slope issues or standing water areas. The concrete needs to be fundamentally sound, even if it has cosmetic issues that can be addressed before overlay.
Step 2: Clean and Prepare the Concrete Surface
Remove all dirt, debris, oil stains, and vegetation using pressure washing and cleaning solutions. Oil spots require special degreasers since petroleum products prevent asphalt from bonding properly. Allow the surface to dry completely before proceeding and remove any loose concrete pieces.
Step 3: Repair and Patch Any Damage
Fill cracks wider than a quarter inch with flexible concrete patching compound. Break out severely damaged sections and patch them with a quick-setting concrete repair mix. Allow all repairs to cure for 24 to 48 hours before continuing.
Step 4: Apply a Tack Coat
A tack coat is a thin layer of asphalt emulsion that acts as glue between concrete and new asphalt. Apply this sticky liquid evenly across the entire surface using spray equipment or rollers. Allow the tack coat to cure until it changes from brown to black, indicating proper setting.
Step 5: Determine Asphalt Thickness
Calculate appropriate overlay thickness based on expected traffic, with residential driveways typically requiring one and a half to two inches. Heavier use areas may need three inches or more. Ensure the planned thickness doesn’t create problematic elevation differences with adjacent surfaces.
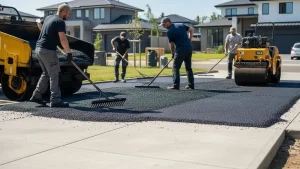
Step 6: Lay the Asphalt Overlay
Professional contractors deliver hot asphalt directly to your property and spread it evenly using rakes and lutes. They work quickly before material cools and ensure consistent thickness across the entire surface. The asphalt must be hot enough to compact properly throughout the installation process.
Step 7: Compact and Smooth the Overlay
Heavy rolling equipment compacts the hot asphalt, pressing it firmly against the tack coat while removing air pockets. Multiple passes with the roller create a smooth, dense surface that resists water penetration. Proper compaction is critical for longevity.
Step 8: Allow for Proper Curing
Fresh asphalt needs 24 to 48 hours to cool and harden before accepting vehicle traffic. Avoid driving on new asphalt for at least one full day, and keep heavy vehicles off for several days if possible. The surface continues hardening over the following weeks.
Step 9: Seal and Maintain
Apply sealcoating six to twelve months after installation once the asphalt has fully cured. This protective coating shields asphalt from UV damage, water penetration, and petroleum spills. Reapply sealcoating every two to three years to maintain protection.
Benefits and Risks of Asphalt Over Concrete
Understanding both advantages and potential problems helps set realistic expectations. Being aware of risks allows you to plan for mitigation strategies and long-term maintenance needs.
Why Asphalt Over Concrete Is Less Commonly Preferred
Many paving professionals prefer working with proper gravel bases because they can control every aspect of installation. Concrete bases introduce variables contractors can’t fully control, including hidden damage and unpredictable movement patterns. Reflective cracking creates aesthetic concerns that some homeowners find unacceptable.
Side Effects of Blacktop on Concrete
Temperature differences between asphalt and concrete cause different expansion rates, potentially creating stress points at edges. The dark asphalt absorbs significantly more heat than concrete, which can accelerate deterioration in extreme climates. Water that penetrates through cracks can become trapped between layers, freezing in winter and causing delamination.
When Full Concrete Removal Is Better
Severely cracked concrete with structural failures requires removal rather than overlay. If your concrete has heaved more than two inches in sections or has extensive alligator cracking, removal provides a better long-term solution. Properties with significant drainage issues may benefit more from complete reconstruction.
Hiring Professionals vs DIY Installation
Asphalt installation requires specialized equipment and expertise that makes it extremely difficult for DIY projects. Understanding when professional help is essential prevents costly mistakes and safety issues.
Expertise and Experience Matters
Professional asphalt contractors understand proper temperatures, compaction techniques, and material grades for different applications. They know how to evaluate concrete conditions and predict potential problems before they occur. Their knowledge of local soil conditions and climate factors helps ensure installations suited to your specific area.
Cost-Effectiveness and Time Efficiency
While hiring professionals costs more upfront, specialized equipment rental and material costs for homeowners often approach professional prices anyway. Contractors complete installations in hours compared to weekend-long DIY struggles that may produce inferior results. Professional work typically comes with warranties covering material and workmanship.
Safety and Compliance with Local Regulations
Hot asphalt causes severe burns if handled improperly, creating serious safety risks. Many municipalities require permits and inspections for paving projects. Professional contractors carry proper insurance protecting homeowners from liability and understand building codes.
Warranty, Guarantees, and Quality Workmanship
Reputable contractors offer warranties covering both materials and installation, typically ranging from one to five years. These guarantees provide recourse if problems develop due to improper installation. Professional work includes proper edge treatment, adequate compaction, and correct material selection.
Consulting Experts Before You Start
Getting professional input before committing to an overlay helps avoid expensive mistakes. Expert consultation costs little or nothing but provides valuable information for decision-making.
Discuss Project with Asphalt Contractors
Contact multiple local contractors to inspect your concrete and provide opinions on overlay feasibility. Ask specific questions about expected lifespan, potential problems, and maintenance requirements. Request references from similar projects and follow up with those homeowners about their experiences.
Get Accurate Quotes for Your Driveway
Obtain written estimates from at least three contractors, ensuring quotes include all preparation work, materials, and finishing details. Compare not just prices but also included services, warranty terms, and project timelines. Clarify payment terms and schedules.
Maintenance and Long-Term Care
Proper maintenance significantly extends the life of your asphalt overlay. Regular attention prevents small issues from becoming expensive repairs.
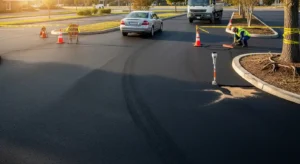
How to Maintain Asphalt Over Concrete
Inspect your asphalt regularly for new cracks, edge damage, or areas showing wear. Keep the surface clean by sweeping away debris and removing oil spills immediately. Fill small cracks as they appear using rubberized crack filler, preventing water infiltration.
Preventing Cracks and Damage Over Time
Avoid parking heavy vehicles in the same spots repeatedly. Keep lawn irrigation systems adjusted to prevent constant water exposure along driveway edges. Watch for vegetation growth at edges and in cracks, removing it promptly before roots cause additional damage.
Conclusion
Overlaying asphalt on concrete offers an economical way to refresh driveways when conditions are right. Success depends on honest evaluation of your concrete’s condition, proper installation techniques, and commitment to ongoing maintenance. Whether you hire professionals or consult them for guidance, understanding the process helps ensure your overlay performs well for many years, providing the smooth, attractive surface you envision.
Ready to transform your driveway?
Contact a local asphalt contractor today for free inspections and quotes, or schedule a consultation to determine if an asphalt overlay is the right solution for your concrete surface.
Frequently Asked Questions
Can you asphalt over concrete without removing it?
Yes, asphalt can be laid directly over concrete without removal as long as the concrete is stable, level, and free from major structural damage. Proper surface preparation and a tack coat are essential for long-lasting results.
How long does asphalt over concrete last?
When installed correctly and properly maintained, an asphalt overlay over concrete typically lasts 15 to 20 years, though lifespan can vary based on traffic, climate, and maintenance practices.
Will cracks in concrete show through the asphalt?
Yes, existing concrete joints or cracks may eventually appear as reflective cracks in the asphalt. These are mostly cosmetic and can be minimized with crack repair and regular sealing.
Is asphalt over concrete cheaper than replacing concrete?
Absolutely. Asphalt overlays usually cost 30–50% less than removing and replacing concrete because they eliminate demolition, disposal, and extensive labor costs.
Is it better to remove concrete or overlay asphalt?
Overlaying is best when concrete is structurally sound. If the concrete has severe cracking, heaving, or drainage issues, full removal and reconstruction may be the better long-term solution.